Creating Project
Lets begin with creating a very basic widget that displays a red square. Just something simple so we can test our Theos setup and also understand a little bit about how custom widgets work under the hood.
First we must create the project using Theos's NIC that we setup previously. If you are bored or aren't using Theos, you can try to create the project manually (the file structure and content is described in the File Structure section).
NIC 2.0 - New Instance Creator
------------------------------
  [1.] iphone/activator_event
  [2.] iphone/application_modern
  [3.] iphone/application_swift
  [4.] iphone/flipswitch_switch
  [5.] iphone/framework
  [6.] iphone/hswidget
  [7.] iphone/library
  [8.] iphone/preference_bundle_modern
  [9.] iphone/tool
  [10.] iphone/tool_swift
  [11.] iphone/tweak
  [12.] iphone/xpc_service
Choose a Template (required): 6
Project Name (required): HSCustomWidget
Package Name [com.dgh0st.hscustomwidget]: com.dgh0st.hscustomwidget
[iphone/hswidget] HSWidgets class name prefix (needs to be unique) [HSCustomWidget]: HSCustomWidget
[iphone/hswidget] HSWidgets display name [Custom Widget]: Custom Widget
[iphone/hswidget] HSWidgets creator [Unknown]: DGh0st
Instantiating iphone/hswidget in hscustomwidget/...
Done.
Just to reiterate:
Make sure the HSWidgets class name prefix is unique when creating a new project, otherwise your widget class name will conflict with another widget leading to your widget not being loaded. If you do get a conflict, you can rename the custom widget view controller class and update the principal class in Resources/Info.plist.
HSWidgets widget follow a similar design as iOS extensions, as in they are bundles that get loaded at runtime. HSWidgets loads these bundles at runtime, specifically all bundles that are installed to a specific directory. It'll then look for the principal class of the bundle to figure out what class corresponds to widget view controller in executable. So all we need to do is make sure that our bundle gets installed to the correct location and that the principal class is a valid widget view controller. Both of which should be taken care of by the Theos template.
File Structure
Template should have created these files:
<Project Directory>
| Resources
| | Info.plist
| | icon.png (not created by template, but can be added if supporting 32-bit devices on iOS 10)
| | icon@2x.png (not created by template, but can be added)
| | icon@3x.png (not created by template, but can be added)
| control
| HSCustomWidgetViewController.h
| HSCustomWidgetViewController.mm
| Makefile
We could compile and run this project, which should display "Custom Widget" as one of the widgets that can be added through HSWidgets' adding view. Doing so will add an empty widget that has no content. But before adding our content, lets better understand how widgets function by looking at what each of these files are used for.
Resources/Info.plist
Provides information about the bundle and also be used to specify some metadata about our widget. Things like icon image name, widget display name, widget view controller class, etc. Here is a list of fields that can be set:
CFBundleIdentifier: (Required) identifier of bundle.
NSPrincipalClass: (Required) principal class that is used as widget view controller. The class needs to be subclass of HSWidgetViewController.
HSWidgetDisplayName: name of widget displayed to users.
HSWidgetIcon: name of icon image.
HSWidgetCreator: name of creator, take credit for your awesome work.
HSWidgetAddNewOptionsControllerClass: class used for displaying additional options via HSWidgets' adding view. This class needs to conform to HSWidgetAdditionalOptions protocol and must be a view controller.
HSWidgetPreferencesControllerClass: class used for adding settings preferences to widgets, specifying a valid class here will enable the settings button as well. This class may conform to HSWidgetPreferences (but is not enforced) and can be any view controller.
Some of these fields can also be set dynamically.
control
Contains information about the package, has same functionality as other Theos projects. There is only one unique things in this file for custom widgets and that is to depend on HSWidgets so that your package manager will install it if not already installed. We can do this by adding com.dgh0st.hswidgets to Depends field.
HSCustomWidgetViewController.h
Header file that interfaces our custom widget that we created. Most important thing to note here is the widget needs to be a subclass of HSWidgetViewController.
#import <HSWidgets/HSWidgetViewController.h>

@interface HSCustomWidgetViewController : HSWidgetViewController
@end
Lets add a property for red square that we are going to add.
@property (nonatomic, strong) UIView *square;
HSCustomWidgetViewController.mm
Now to the fun part, coding the widget. The template should have generated following code in this file:
#import "HSCustomWidgetViewController.h"

@implementation HSCustomWidgetViewController
-(void)viewDidLoad {
	[super viewDidLoad];

	// add custom view
}

+(HSWidgetSize)minimumSize {
	return HSWidgetSizeMake(1, 1);
}
@end
Notice the new type here called HSWidgetSize, which is defined as:
typedef struct HSWidgetSize {
	NSUInteger numRows;
	NSUInteger numCols;
} HSWidgetSize;
Its a struct for managing number of rows and columns.
Overriding minimumSize is specifying that our widget requires a minimum of 1 row and 1 column. HSWidgets uses this size to determine if the widget can currently be added to home screen page. If we were to change this size to 2x2, it would only show in HSWidgets' adding view if there was enough space to fit 2x2 widget.
Widgets are just view controllers so we can add our custom square view as a subview of the view controller's view. Lets add our squre in viewDidLoad:
self.square = [[UIView alloc] initWithFrame:CGRectMake(5, 5, 50, 50)];
self.square.backgroundColor = [[UIColor redColor] colorWithAlphaComponent:0.5];
self.square.layer.cornerRadius = 5;
[self.view addSubview:self.square];
That is all we need to do add a custom view.
Makefile
Last but not least, the makefile that Theos can use to package the deb correctly. Custom widgets are just bundles as explained earlier, so we only need to setup bundle variables that Theos can then use to create the package. First we need to link HSWidgets framework that compiler can use to find header files and that linker can use to link against symbols in tbd. We do this by adding:
<Bundle Name>_EXTRA_FRAMEWORKS = HSWidgets
This will look for HSWidgets framework in your framework search paths ($THEOS/lib for instance) so make sure you setup your Theos Environment correctly.
Next is getting the widget bundle to be installed to correct spot so that HSWidgets can load it. HSWidgets loads all widget bundles in /Library/HSWidgets directory so add:
<Bundle Name>_INSTALL_PATH = /Libary/HSWidgets
The generated file should already have both of these so the final version of makefile should have something like this:
INSTALL_TARGET_PROCESSES = SpringBoard

include $(THEOS)/makefiles/common.mk

BUNDLE_NAME = HSCustomWidget
HSCustomWidget_FILES = HSCustomWidgetViewController.mm
HSCustomWidget_FRAMEWORKS = UIKit
HSCustomWidget_EXTRA_FRAMEWORKS = HSWidgets
HSCustomWidget_INSTALL_PATH = /Library/HSWidgets
HSCustomWidget_CFLAGS = -fobjc-arc

include $(THEOS_MAKE_PATH)/bundle.mk
Testing/Running
Compiling and running above code should add "Custom Widget" as one of the options when going into HSWidgets' adding view. Then adding the widget should display our red square.
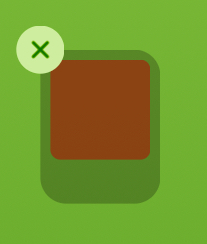
But that looks funky with the corner radius not matching and editing view being bigger than our content view. To fix the corner radius we just need to get current corner radius from super class via self.cornerRadius (alternatively we could also set that property to a custom value).
For the sizing issue we can increase size of our content to match container size. Auto layout with anchors would be really easy to implement here to do exactly that so lets do it. All sides of our square need to be anchored to corresponding sides of container view (self.view), which we can do right after creating our view inside viewDidLoad:
self.square.translatesAutoresizingMaskIntoConstraints = NO;
[self.square.topAnchor constraintEqualToAnchor:self.view.topAnchor].active = YES;
[self.square.bottomAnchor constraintEqualToAnchor:self.view.bottomAnchor].active = YES;
[self.square.leadingAnchor constraintEqualToAnchor:self.view.leadingAnchor].active = YES;
[self.square.trailingAnchor constraintEqualToAnchor:self.view.trailingAnchor].active = YES;
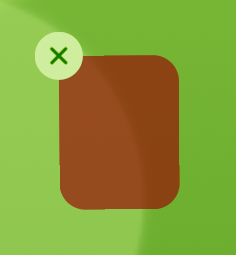
That looks much nicer but thats not really a square anymore, so what if we wanted to keep our previous size? Well we can resize the editing view instead. HSWidgets supports this by letting subclasses override calculatedFrame.
-(CGRect)calculatedFrame {
	return CGRectMake(5, 5, 50, 50);
}
For consistency, we could also call this method to set frame of our square but I'll leave that for you to practice.
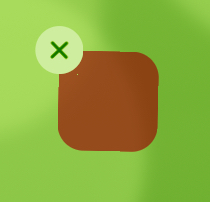
Finally rounded square widget! Yay!